
Update Lenovo ThinkPad SSD Firmware through MDT
As SSD drives become more and more common in ThinkPad model, we also see an increasing need to be able to update the firmware on these storage devices. This blog post will describe how to deploy the Solid State Drive Firmware Update Utility for ThinkPad through MDT.
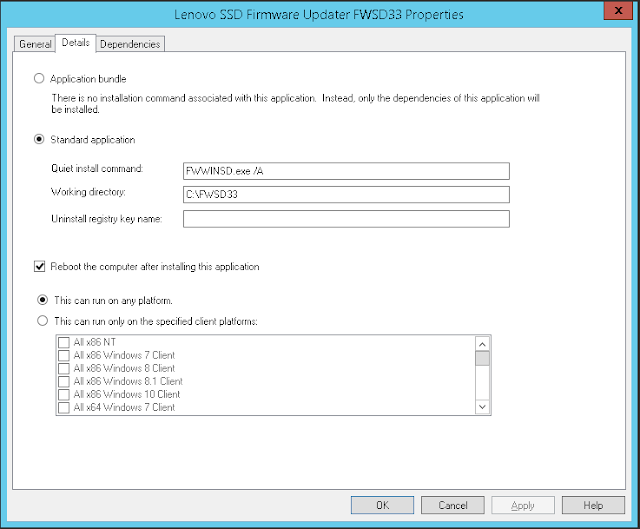
Once created, open the application and select the "Reboot the computer after installing this application". The details of the application should be similar to below.
In the SSD FW group create a Run Command Line task. In the properties tab, fill in the following:


Since the SSD Firmware update should only be run while on AC power, we can add a few WMI queries to determine if AC power is plugged in and if the battery is currently discharging.
Switch to the Options tab on the Install Application task. Click on the Add button and select If statement. Choose All conditions are true and click OK. Highlight If all conditions are true and then click the Add button and select Query WMI.

Repeat the steps to create a second WMI Query.

Repeat the steps to create a third WMI Query.

Once all of this is added to MDT, deploy a system where the update is applicable and the Task Sequence should deploy the firmware to the drive. A log file (fwwinsd.log) is generated in C:\FWSDXX\ when FWWINSD.exe is executed. This log file can provide information for troubleshooting and confirmation the utility ran successfully. If the log file is not there, but the files are, either the computer did not have AC power connected at the time of deployment, or there was an issue with the execution of the .exe.
Overview of the solution:
- Obtain and extract SSD firmware media
- Setup the server side folder structure
- Configure MDT
- Add SSD Firmware as MDT application
- Edit the Task Sequence
- Copy Command
- Install SSD Firmware based on WMI Queries
Obtain and extract SSD firmware media
Begin by downloading the SSD Firmware update from the Lenovo Support Site. This is the current version as of July 25, 2016. This package provides the firmware updates for several different SSD drives for several different ThinkPad models which are listed on the linked page. The readme available from that page also identifies the specific SSD drives that are covered. Once the .zip file is downloaded, extract it to FWSDXX folder where XX is the 2 digit version.Setup the server side folder structure
For the server side folder structure, create a new share (or use an existing share with appropriate permissions) on a server. In that share, create a folder called SSDFirmware. Copy the FWSDXX folder to the new SSDFirmware folder created.Configure MDT
Add SSD Firmware as MDT Application
In MDT the first step is to create an Application for the SSD Firmware. In the new application wizard, select the option for an "Application without source files or elsewhere on the network." Click Next. Fill in the Publisher, Application Name, and version. Once completed, click Next. In the command line, type infwwinsd.exe /AThe /A has to be capitalized for the switch to complete successfully. Next fill in the working directory with C:\FWSDXX\ where XX indicates the 2 digit version. Click Next to examine the summary. Click next to create the application. Click Finish to finalize the creation of the application.
Once created, open the application and select the "Reboot the computer after installing this application". The details of the application should be similar to below.

Edit the Task Sequence - Copy Command
In a Task Sequence, in the State Restore section, find the section where Lenovo ThinkPads are having their Hardware Applications installed. Create a new group called SSD FW. At this point, so as not to affect systems where this firmware does not apply, it would be best to apply a model query to this folder. On the SSD FW folder, switch over to the Options tab and select the Add button. Choose If statement and then choose Any conditions are true. Select the If any conditions are true statement and the click the Add button. Select Query WMI. Use a similar query as below to target just the models you need.WMI Namespace: Root\CIMv2Repeat until all necessary models are identified.
WQL Query: SELECT * FROM ComputerSystemProduct WHERE Version = 'ThinkPad W550s'
In the SSD FW group create a Run Command Line task. In the properties tab, fill in the following:
Name: Copy SSD Firmware to Local DriveCommand Line: cmd /c xcopy \\<Server>\<Share>\SSDFirmware\FWSDXX\*.* C:\FWSDXX\ /seyivq

Edit the Task Sequence - Install SSD Firmware based on WMI Queries
In the SSD FW group create an Install Application task. On the properties tab fill in the following:Name: Lenovo SSD Firmware Updater FWSDXXInstall a single application: Lenovo SSD Firmware Updater FWSDXX

Since the SSD Firmware update should only be run while on AC power, we can add a few WMI queries to determine if AC power is plugged in and if the battery is currently discharging.
Switch to the Options tab on the Install Application task. Click on the Add button and select If statement. Choose All conditions are true and click OK. Highlight If all conditions are true and then click the Add button and select Query WMI.
WMI Namespace: Root\WMIWQL Query: SELECT * FROM BatteryStatus WHERE PowerOnline = 'TRUE'

Repeat the steps to create a second WMI Query.
WMI Namespace: Root\WMIWQL Query: SELECT * FROM BatteryStatus WHERE Discharging = 'FALSE'

Repeat the steps to create a third WMI Query.
WMI Namespace: Root\WMIWQL Query: SELECT * FROM BatteryStatus WHERE Voltage > '0'

Once all of this is added to MDT, deploy a system where the update is applicable and the Task Sequence should deploy the firmware to the drive. A log file (fwwinsd.log) is generated in C:\FWSDXX\ when FWWINSD.exe is executed. This log file can provide information for troubleshooting and confirmation the utility ran successfully. If the log file is not there, but the files are, either the computer did not have AC power connected at the time of deployment, or there was an issue with the execution of the .exe.